Set up a new company
The very first time someone signs in to Jobyo without a company, they land on the setup flow. It runs in two parts: register a workspace (name your company, pick a plan, pay) and then the onboarding wizard (confirm who you are, fill a short business-settings baseline, and confirm you're ready). This page walks the whole journey for a brand-new owner.
Who this is for
This is the new owner's first experience. When you create a workspace you become the company owner — the top security role, with full authority and billing rights. Everything on this page is done by that first person. People who join an existing company follow a shorter path (see the join section below) and skip the owner-only onboarding steps entirely.
The journey at a glance
| Part | Step | What happens |
|---|---|---|
| Register | Choice | Create a new workspace, or join an existing one |
| Register | Company details | Name your company and yourself |
| Register | Plan & checkout | Pick a plan, choose seats, pay via Stripe (or start a trial) |
| Onboard | Welcome | Confirm you're the right person setting up |
| Onboard | Business settings | Currency, company info, logo, tax, labour rates |
| Onboard | Ready | Review and finish |
The whole flow is resumable. You can sign out at any step and sign back in later — Jobyo restores you to the exact step you left. You are never trapped in setup.
Part 1 — Register a workspace
Choose how to start
Create your account
New here? On the sign-in screen switch to Create account and enter your display name, email, and a password (or continue with Google, Microsoft, or Apple), then accept the Terms and Privacy Policy.
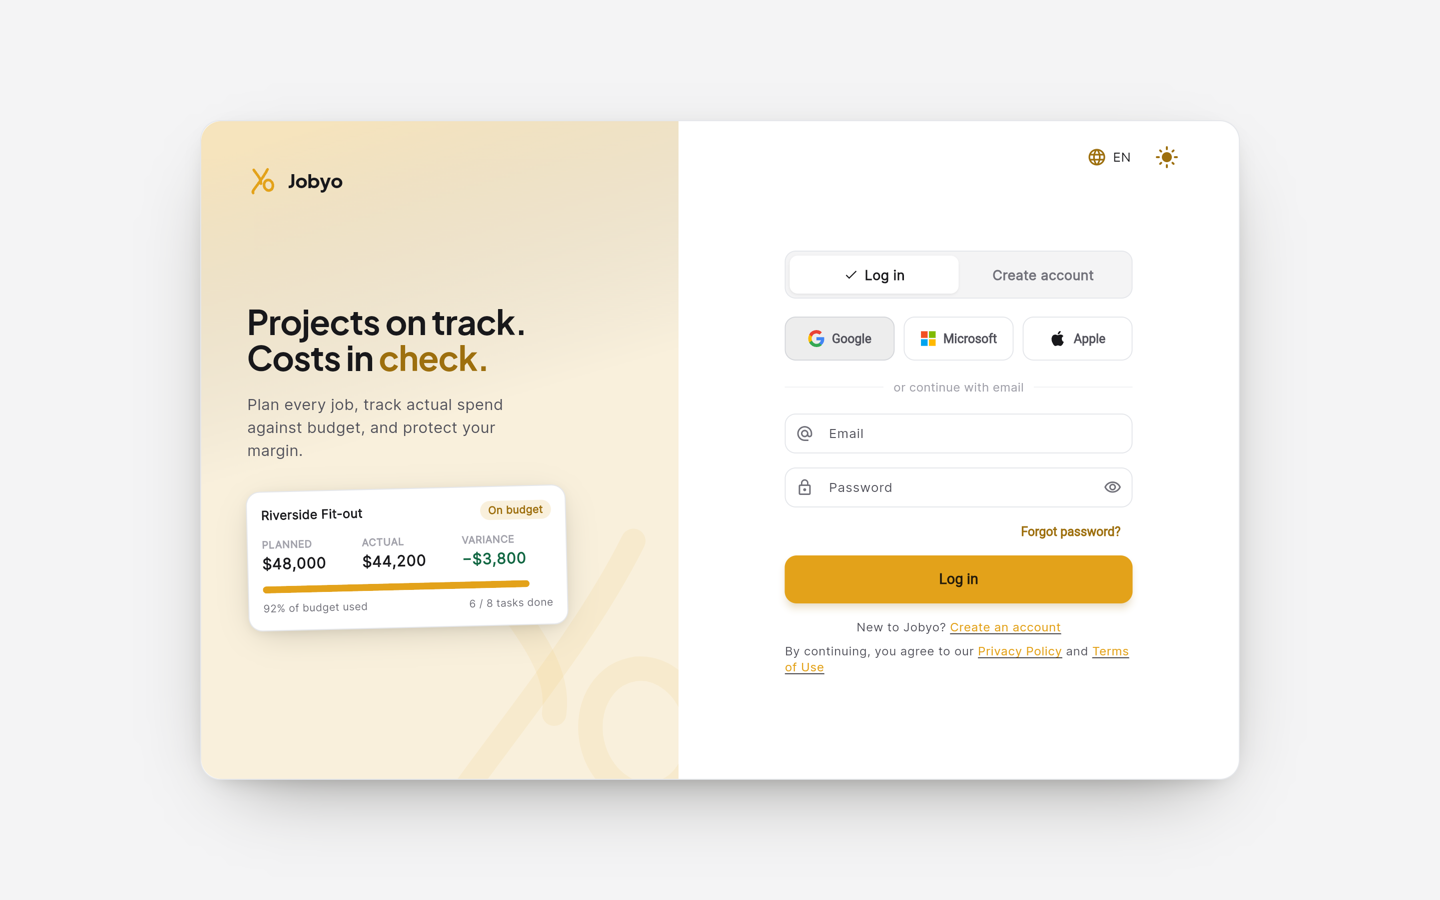
Sign in or create your account — email/password, or Google, Microsoft, Apple Verify your email
If you signed up with email and password, Jobyo emails you a verification link. Open it, come back, and tap I've verified — check again (sign in again if prompted). Signing up with Google/Microsoft/Apple skips this.
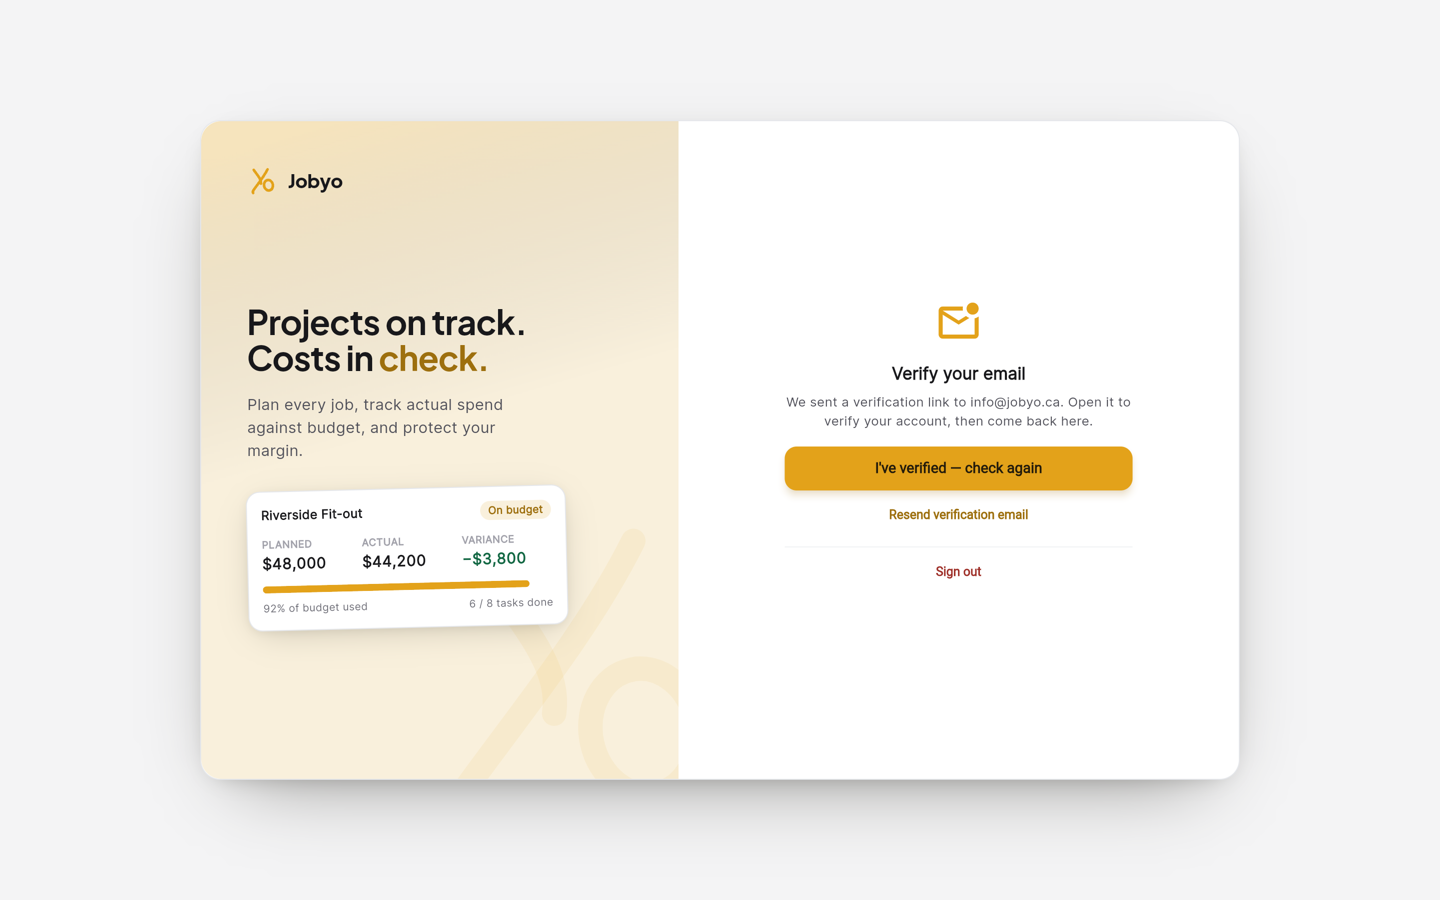
Verify your email — open the link we sent, then check again Sign in with your new account
After you sign in for the first time with no company attached, Jobyo shows Set up your workspace with two choices.
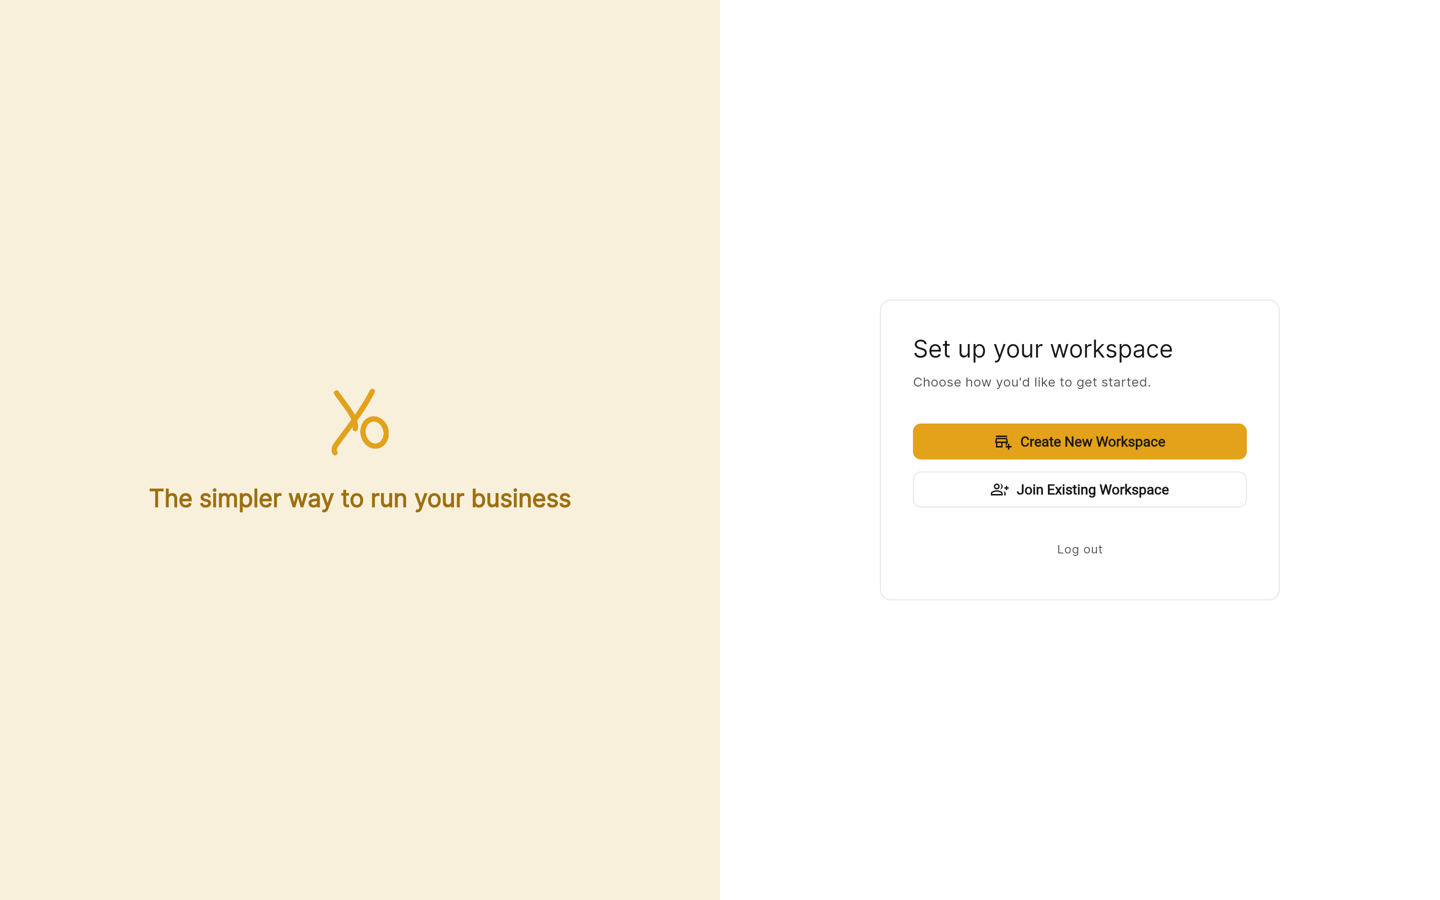
Set up your workspace — Create New Workspace vs Join Existing Workspace Pick Create or Join
- Create New Workspace — you're starting a brand-new company. This is the owner path (continue below).
- Join Existing Workspace — your company already exists in Jobyo and you want to be added to it. See Join a company & approve members.
A Logout link is always available if you signed in with the wrong account.
Enter your company details
Open the company form
Choosing Create New Workspace opens Create Your Workspace — "Enter your company details to get started."
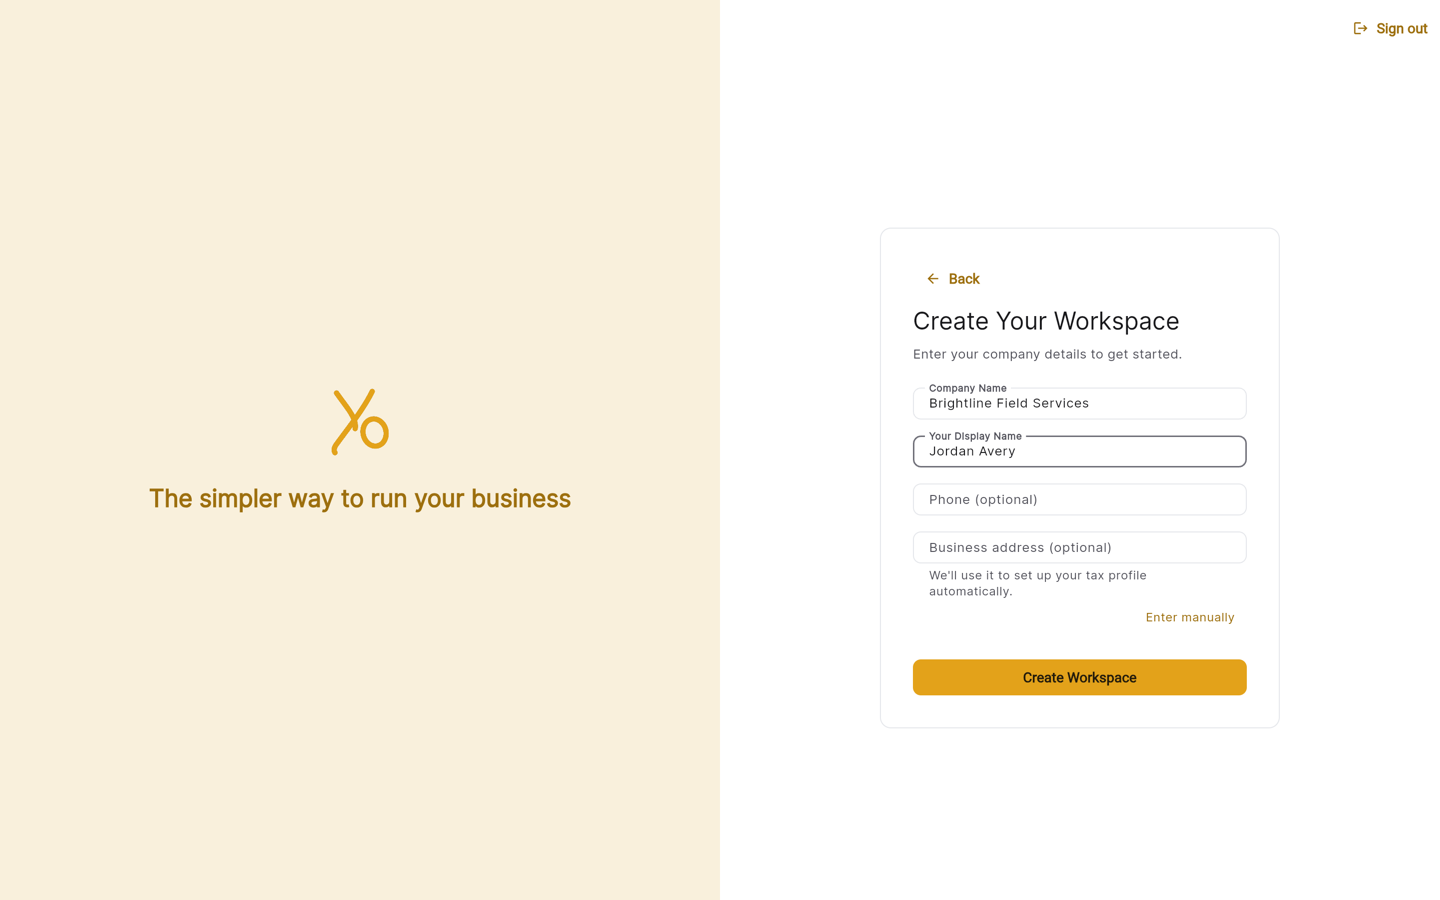
Create Your Workspace — company name, your display name, optional phone and address Fill in the required fields
- Company Name — required. This names your company and is also used to build your shareable company code.
- Your Display Name — required. Becomes your own profile name as the owner.
- Phone — optional.
Add a business address (optional)
Start typing your address and pick a suggestion from the autocomplete list. Jobyo uses it to set up your tax profile automatically. It's entirely optional — if the lookup finds nothing, you can carry on without it, and it never blocks registration.
Create the workspace
Select Create Workspace. One request provisions your whole tenant.
In a single step, Jobyo provisions the company record, makes you the company owner (full-authority role, billing admin — your sign-in email becomes the company's owner and billing contact), and seeds starter teams (Service/Repair, Maintenance, Installation), default company preferences, security roles, a default Main Warehouse stock location, and a shareable company code (for example JOBYO-ACME-001) that others use later to request to join. As the owner you are deliberately not placed on any team by default.
If creating the workspace fails partway (for example a dropped connection), just try again with the same account. Jobyo resumes the same company rather than creating a duplicate — one account maps to exactly one company.
Choose a plan and check out
After the company exists, you're taken to plan selection to start a subscription.
Compare plans
The Choose a plan screen lists the available plans, each with a name, description, price, and included features. Toggle Monthly / Annual at the top — annual plans show the equivalent monthly price plus the amount billed annually and a Save % badge where a discount applies.
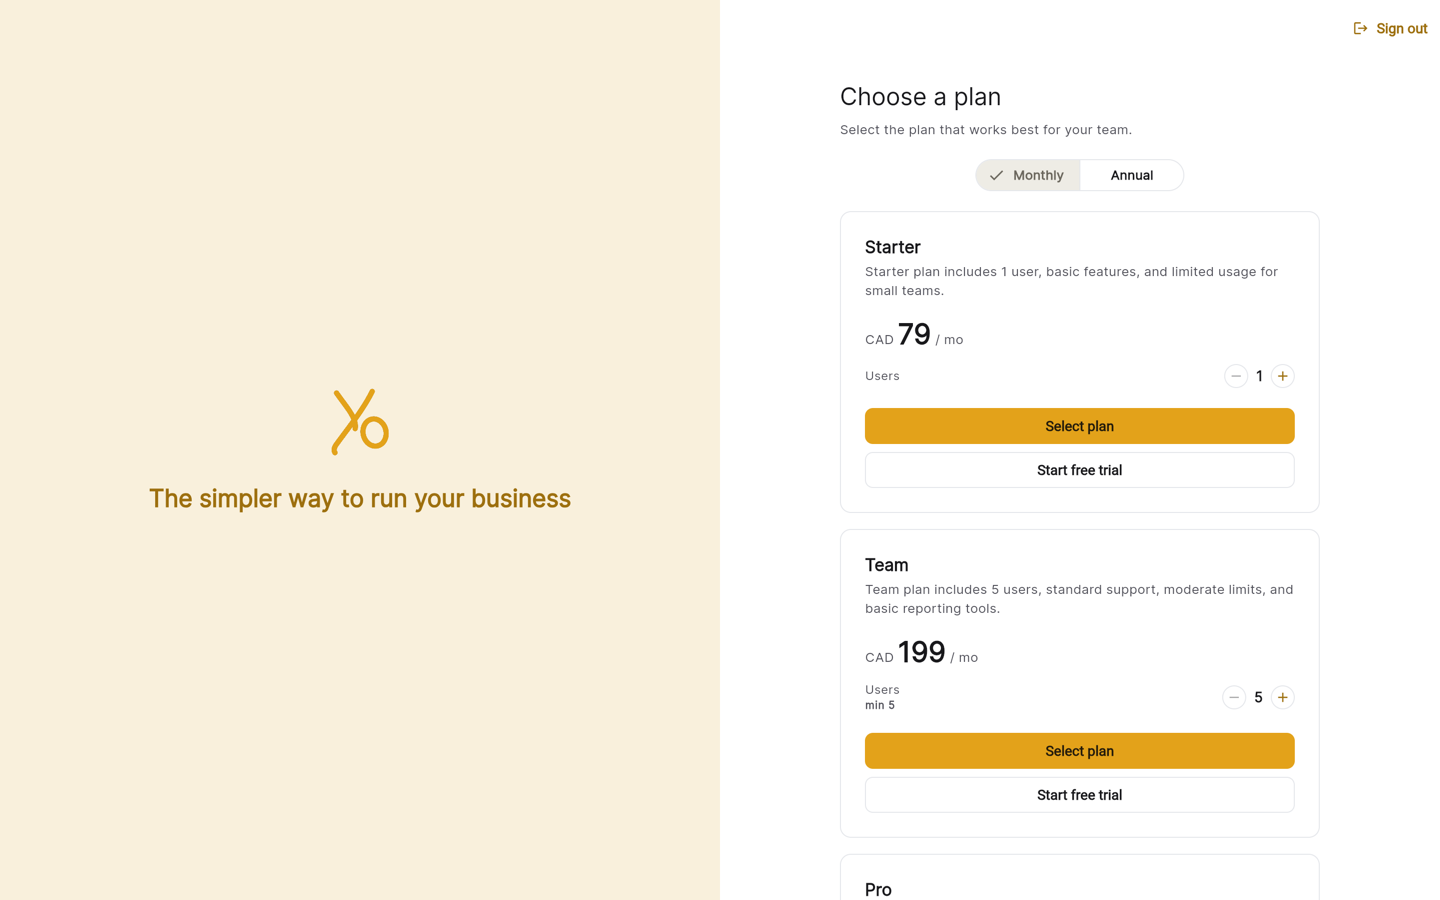
Choose a plan — Monthly/Annual toggle, plan cards, seat stepper, Select plan Set the number of users (seats)
Each plan card has a Users stepper. Some plans include a minimum number of seats (shown as "min N") — you can add more but not go below the minimum. Seats control how many people can log in; you assign them later (see Subscriptions & plans).
Start checkout
Select Select plan. Jobyo opens an external Stripe checkout page in your browser to collect payment. When you finish and return to the app, Jobyo detects the completed subscription and hands you off to onboarding.
Or start a free trial
When your company is eligible, a Start free trial button appears under the plan's Select button. It starts a trial subscription for the chosen plan, seats, and billing period without going through Stripe checkout. A short "finalising" screen may appear while the subscription is confirmed in the background — use Check status if it lingers.
Choosing a plan, running Stripe checkout, and starting a trial happen on the web app. In the iOS or Android app these steps are replaced by a "Finish setting up on the web" message, because app-store rules don't allow an external checkout inside the app. Create your company and subscribe on the web, then sign in on mobile.
If the plan list fails to load, use Retry. If checkout doesn't open, you'll see "Could not open the checkout page" — try again. Signing out mid-selection is safe; you'll return to plan selection on your next sign-in because the company already exists.
If you chose Join instead
If you picked Join Existing Workspace, you submit a join request and land on Awaiting approval — "Your request to join has been submitted. An administrator must approve it before you can get started."
- Check status re-checks whether an admin has approved you yet.
- Withdraw request cancels the pending request and returns you to the choice screen.
- Log out signs you out.
Joined members are provisioned by their company's admin and skip the owner-only onboarding steps below — their owner already completed them. Full details: Join a company & approve members.
Part 2 — The onboarding wizard
Once your company exists and a subscription is active, the owner walks through a short guided wizard. A step indicator at the top shows three steps — Welcome → Business settings → Ready — but the first is normally already complete (see Step 1 below), so in practice you start on Business settings. On mobile it reads as "Step N of 3" with the step's name.
Onboarding is server-driven. Each time it loads, Jobyo checks what's still missing and shows the one step you need next. Completing a step advances you automatically; you can't skip ahead or land on the wrong step.
Step 1 — Welcome (normally already done for you)
In practice you won't see a screen here. Jobyo pre-satisfies this first step automatically when your workspace is created — your billing currency is set from your country as part of registration, which is enough to clear the step — so the indicator shows step 1 already checked and you land straight on Business settings.
An explicit Welcome / "This is me — continue" confirmation only appears in the rare case of a workspace with no baseline at all. For the normal first-run, continue to Step 2.
Step 2 — Business settings baseline
This step is a small wizard-within-the-wizard. It opens on a "Let's set up your company" screen — "About 2 minutes. We've filled in smart defaults — change anything you like." Jobyo lists only the sections you still need, each tagged Ready (a default is fine) or Needs you (real input required), then walks you through them one at a time. A "Business setup · N of M" counter tracks your progress, and the total shrinks as sections complete. Each Continue saves that one section.
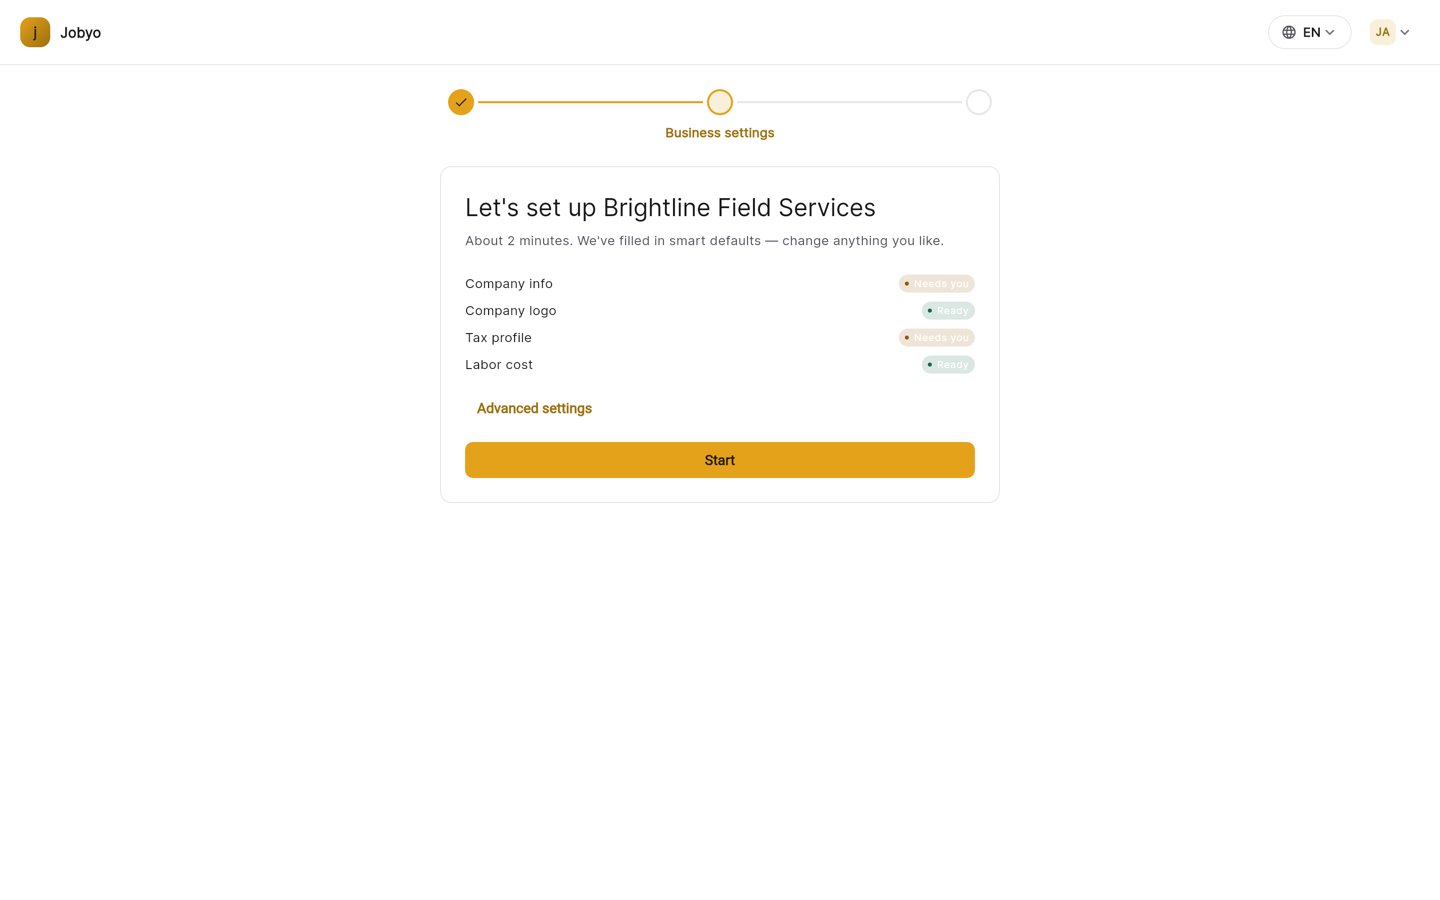
The sections, in order:
Currency (normally already set)
Your billing currency is set from your country when you register, so this usually doesn't appear as a step — you'll simply see it ticked on the final review. It only surfaces here if a currency wasn't set. You bill in one of CAD, USD, EUR, or GBP.
Company info
Used on your invoices and documents. Jobyo already has your company name, and pre-fills a Receivable email (customers) and Payable email (suppliers) from your sign-in address and your Country — so the input this section really needs is your address (street, city, province, postal code), which you can look up or enter manually. The receivable email is what prints on your outbound invoices; the payable email is where suppliers reach your accounts-payable team. Both start from your sign-in address until you change them.
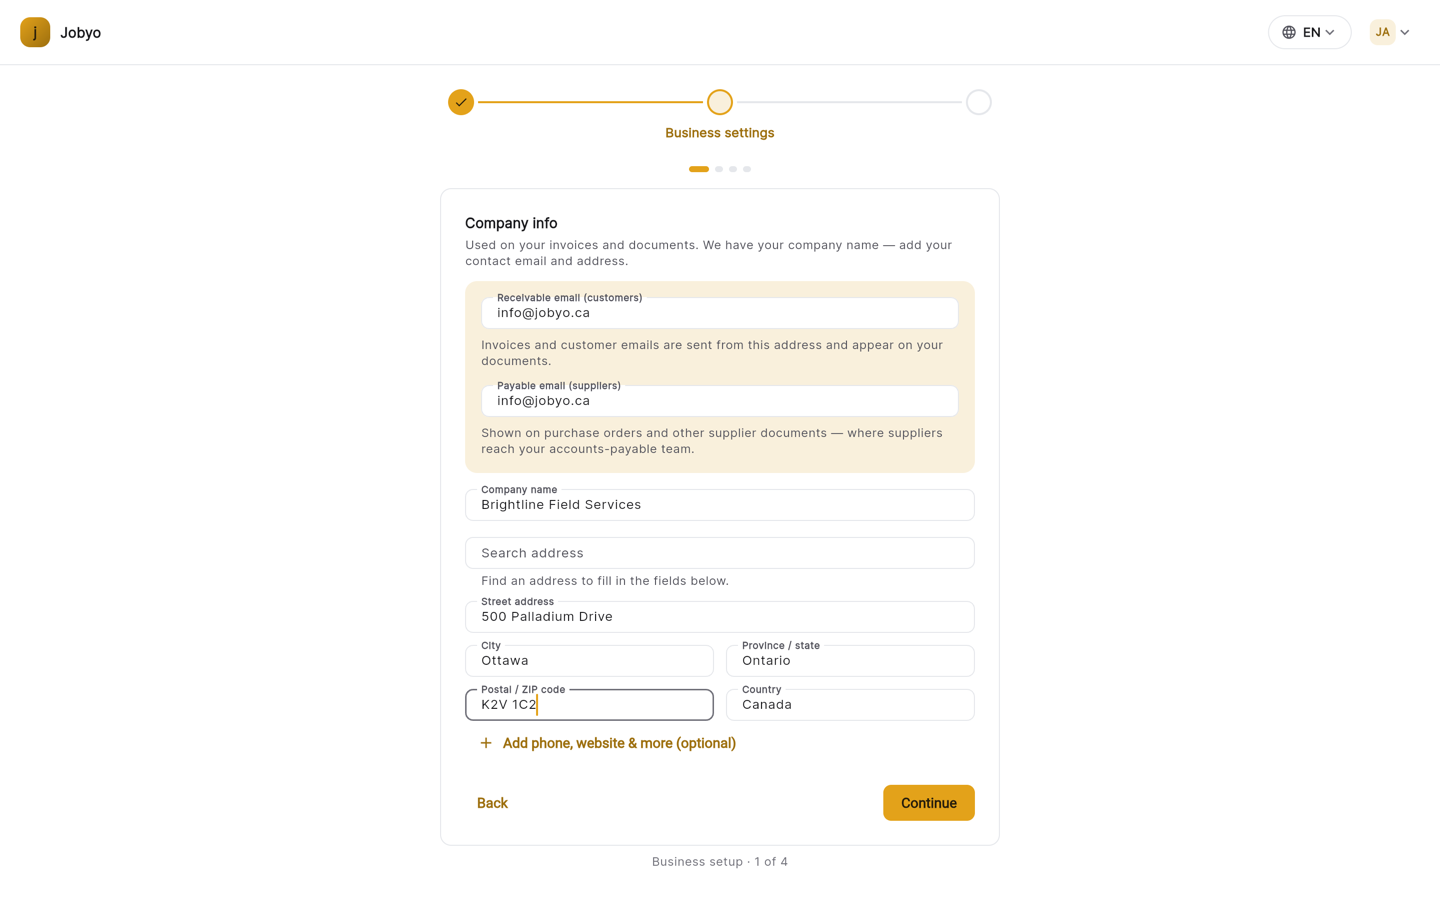
Company info — pre-filled receivable/payable emails and company name; add your business address Company logo (optional)
Add a logo now or later. This never blocks — use Skip for now to move on.
Tax profile
Choose one of three paths:
- Canadian province — pick your province and Jobyo previews and applies the standard rates as one tax profile.
- Custom rates — name the profile and enter your own rate rows (title + percentage), adding rows as needed.
- Not registered for sales tax — no profile is created. Tax setup is never a hard requirement.
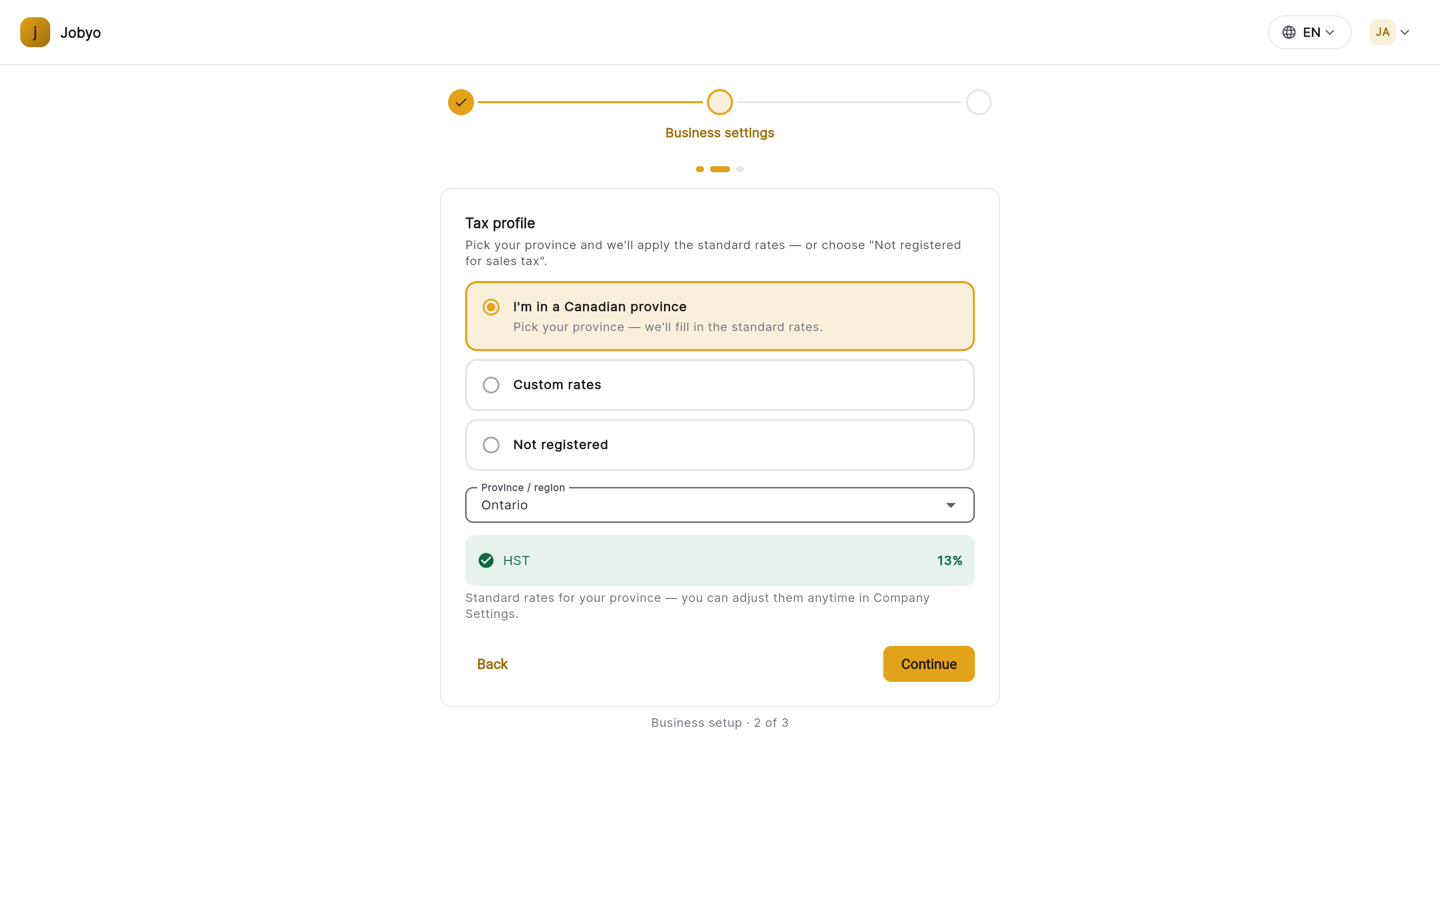
Tax profile — pick a Canadian province and the standard rate is applied automatically (e.g. Ontario → HST 13%) Labour cost
Suggested default rates for pricing labour and transport — confirm or adjust. Jobyo pre-fills a Standard Labour profile with a labour rate per hour and a dual transport rate (per hour and per km) so work is priceable whether a worker logs time or distance. Because the defaults are pre-filled, you can just Continue.
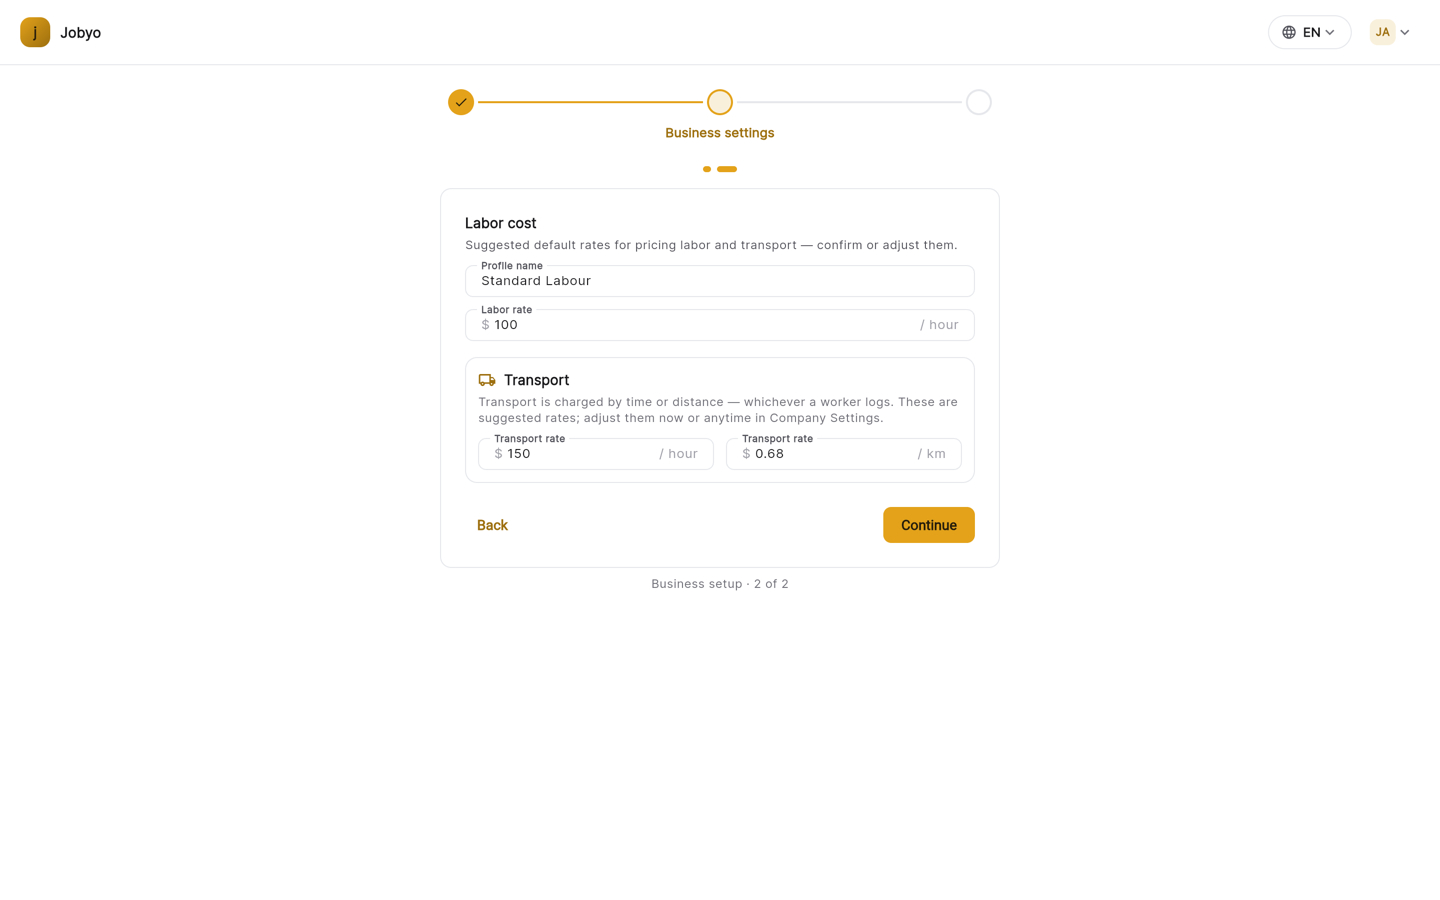
Labour cost — pre-filled Standard Labour profile with labour and transport rates
An Advanced settings link on the intro jumps to the full Company Settings page if you want the complete forms instead of the mini-forms.
You'll only see the sections that aren't already set. On an existing tenant, some may be pre-filled and skipped. After the last section, Jobyo re-checks your status and advances.
If you detour into Advanced settings and change things there, onboarding doesn't automatically notice on return. Trigger a re-check (continue a step, or use a retry action) so the wizard picks up your changes.
Step 3 — Confirm you're ready
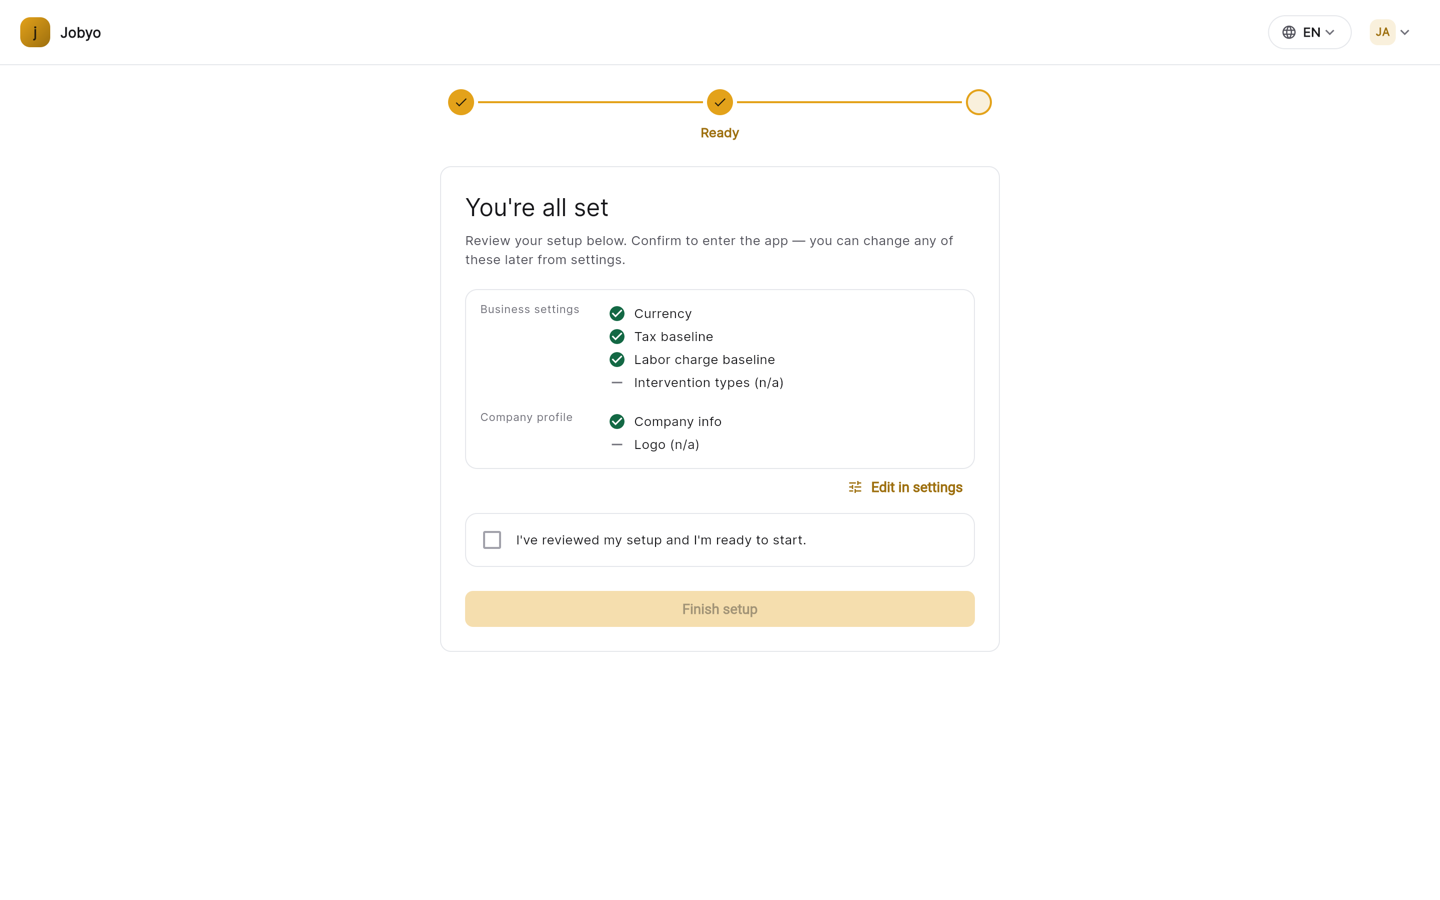
The final You're all set screen shows a read-only review of what you configured — your business-settings completion (Currency, Tax baseline, Labor charge baseline) and company profile (Company info) — with an Edit in settings link if anything looks wrong.
There's no team-setup step in the wizard — your starter teams (Service/Repair, Maintenance, Installation) were created when you registered, and you can adopt or ignore them at your own pace. Manage teams and members from Users, teams & roles after setup.
Tick "I've reviewed my setup and I'm ready to start.", then select Finish setup. Jobyo confirms your readiness and drops you into the app on your Home dashboard.
Finish setup stays disabled until you tick the confirmation box — the final step is an explicit check, not a blind tap. Everything you set can still be changed later from settings.
Blocked and waiting states
Sometimes onboarding can't move forward on its own. Instead of a step screen, you'll see a status card. There are two kinds.
Waiting (temporary) — with a Check status button:
| State | What it means |
|---|---|
| Awaiting seat assignment | Billing is valid but you don't hold a seat yet. Use Check status once a seat is assigned. |
| Awaiting package readiness | Your subscription isn't ready yet. On the web, if you're the billing admin, this becomes the in-app plan-selection / checkout screen (plus Start free trial when you're eligible) so you can resolve it yourself. |
Blocked — contact an administrator (no self-service):
| State | What it means |
|---|---|
| Account disabled | Your account has been disabled. Contact your administrator. |
| Profile disabled | Your profile has been disabled. Contact your administrator. |
| Billing suspended | The subscription is suspended. The billing admin needs to resolve billing. |
| Access unavailable (not billing admin) | The subscription needs attention but you're not the billing contact. Ask your billing admin to sort it out. |
Every one of these cards still lets you sign out — for example to sign in with a different account while the block is cleared offline.
In the iOS or Android app, any billing-related state collapses to a single neutral "Account setup pending" card with a Check status action and no billing wording — app-store rules forbid pointing at an external payment flow from inside the app. Resolve billing on the web.
The Billing suspended and Awaiting seat assignment states depend on a billing-read feature that is currently turned off in production, so they don't fire for live tenants yet. They're documented here because the screens exist and the feature is planned.
If it doesn't work
- "Company Name is required" / "Your Display Name is required"Both fields are mandatory. Fill them in and select Create Workspace again.
- A second company seems to be created on retryIt isn't — Jobyo resumes the same company for your account. One account maps to exactly one company; retries repair the setup rather than duplicate it.
- No plan list, or "No plans available"Use Retry. If it persists, contact support — plans are served from the billing service, not created here.
- "Could not open the checkout page"The external Stripe page failed to launch. Try Select plan again; make sure pop-ups are allowed.
- Plan selection is missing in the mobile appChoosing a plan and checkout are web-only. Finish creating and subscribing on the web, then sign in on mobile.
- Stuck on "Awaiting approval" after choosing JoinAn admin must approve your join request. Use Check status to re-poll, or Withdraw request to start over.
- Business settings changed in Advanced settings but the wizard still asks for themOnboarding doesn't auto-refresh after the Advanced settings detour. Continue a step or use a retry action to re-check your status.
- A blocked or "Account setup pending" card with no way forwardThese need an administrator or billing admin to act. You can still sign out to use a different account while it clears.